Absorbance, fluorescence and luminescence are the three most commonly used detection methods in microplate-based assays. Unlike absorbance, fluorescence and luminescence are not absolute measurements and depend on an artificial parameter called ‚gain‘.
But what is the gain setting? And how exactly does it influence your measurements? Simply put, the gain setting regulates the measurement range on a microplate reader. It is a factor that defines the amplification of an incoming light signal by the microplate reader´s detection system.
Did you know?
The gain setting is the main parameter influencing a microplate reader’s measurement range, the ratio between the brightest and dimmest intensity the reader can quantify.
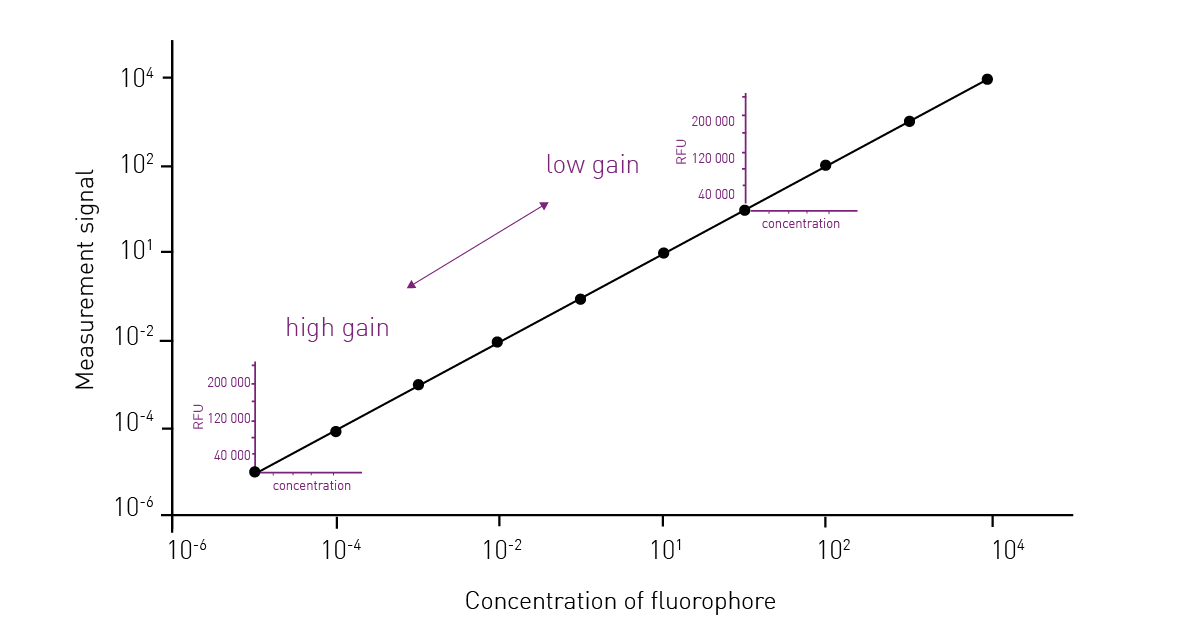
A high gain setting provides large amplification of light signals and is suitable for samples generating dim signals. Conversely, a low gain setting amplifies sample signals less and is suitable for samples that produce a very bright light signal. Selecting the appropriate gain setting for your test samples is therefore important to achieve the best possible results.
Did you know?
The gain setting has an artificially set range. This range differs between plate readers from different manufacturers which prevents direct comparison of measurements. However, the maximum gain always represents the highest possible signal amplification.
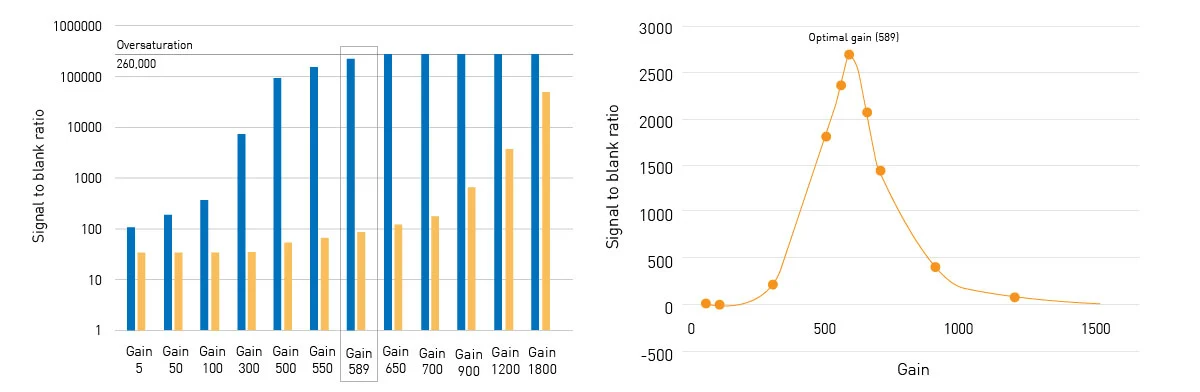
 In this example, a fluorophore standard curve (1 pM to 100 nM) was measured at different gain settings. The optimal gain determined by the microplate reader was 589. Gain settings higher than the optimum (gain 700 and 900 curves) led to an oversaturation of the detector at high sample concentrations. If oversaturation occurs, data points are recorded and displayed with the highest possible value (here: 260,000). Although gain settings below the optimum resolve all data points of the standard curve, differentiation between the lower standards and blank samples is increasingly difficult.
Inappropriate gain settings will negatively affect data quality, the assay window, and sensitivity. If bright samples are measured with a high gain, this can result in the saturation of the detector and unusable data (fig. 2). In contrast, if dim signals are detected with a low gain, they may become indistinguishable from the background noise (fig. 3A). If you want to compare data from multiple test runs, the use of the same gain setting for each measurement is recommended while keeping the same experimental conditions.
Did you know?
By performing gain adjustment on a full plate, the microplate reader identifies the well in the defined plate layout which generates the strongest light signal and adjusts the gain setting accordingly.
The lower the gain is set from the optimal value (gain 589), the closer the values for the 100 nM fluorophore standard (blue columns; fig. 3A) will be to the values of the blank samples (orange columns; fig. 3A). Conversely, measured values of blank samples approach oversaturation and the 100 nM fluorophore standards when using higher-than-optimal gain settings. The optimal gain setting provides the best signal-to-blank ratio, an important indicator for data quality. This ratio decreases accordingly when moving away from the optimal gain (fig. 3B).
How to adjust the gain setting on BMG LABTECH readers?
The gain setting of a BMG LABTECH reader can be adjusted after selecting a test protocol, right before the start of the measurement. Simply select a sample well (or multiple wells) you want to perform a gain adjustment on, select fixed range (gain) and click the “start adjustment” button.
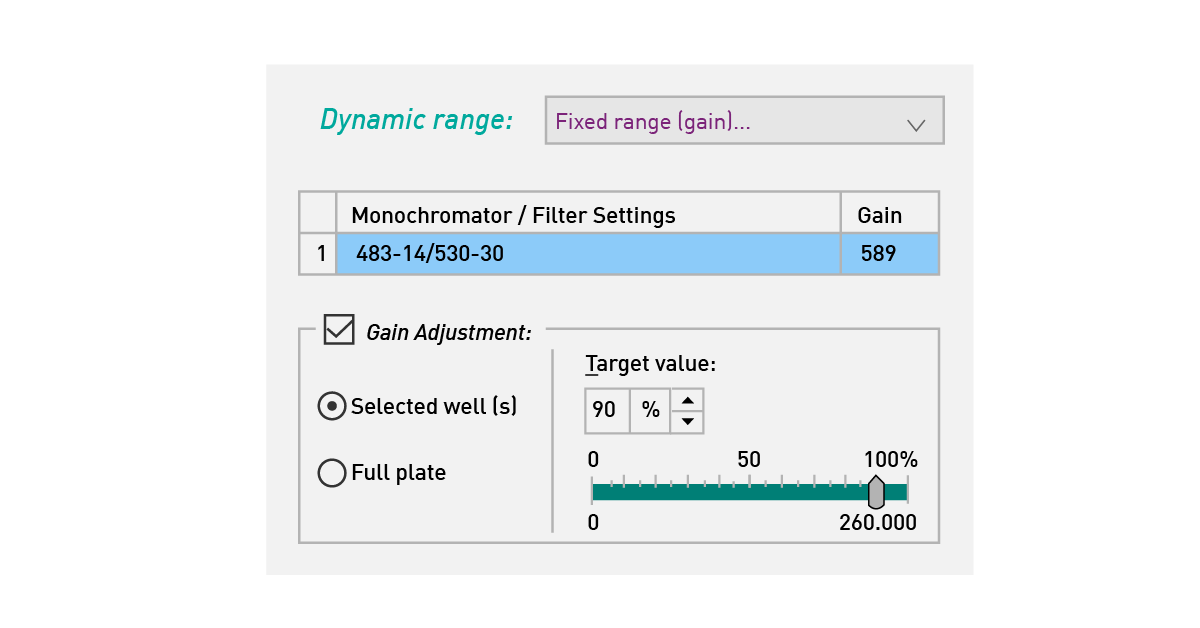
In general, gain adjustment should be performed with a target value of 90% on the sample well that is expected to generate the strongest light signal. In this way, all data points of a measurement can be recorded and depicted appropriately. However, this is not always possible since the generated light signal might change over time in kinetic measurements. In such cases, a target value of 10% on a blank sample is recommended as a starting point. The target value (see “How to adjust the gain setting on BMG readers”) of a measurement can be adjusted in 1% increments to fine-tune the strength of the recorded signal.
Did you know?
The Enhanced Dynamic Range (EDR) function available on the VANTAstar®, PHERAstar FSX and CLARIOstar® Plus readers can be used for a continuous and automatic adjustment of the gain setting throughout a measurement.
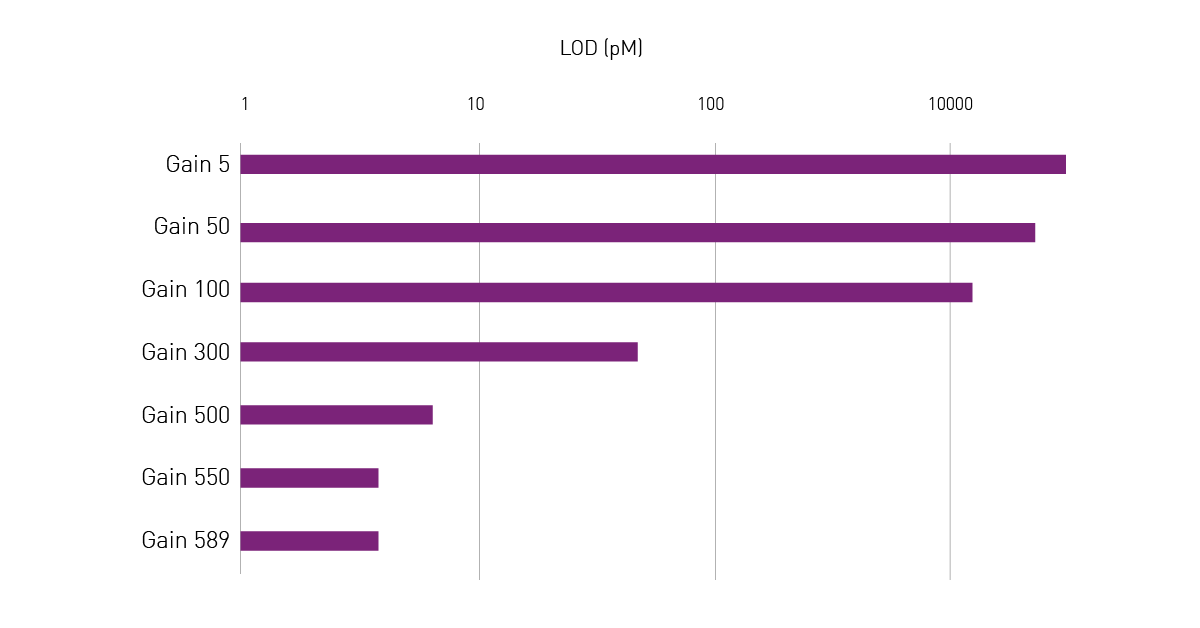
Since measured values of test samples become increasingly indistinguishable from blank values when using gain settings below the optimum, the limit of detection (LOD) of an assay is affected accordingly and increases (fig. 5). In this example, a LOD of 3.9 pM could be determined using the optimal gain setting of 589, whereas reducing the gain setting to 300 already increased the LOD to 481.3 pM. Gain values below 300 caused a further loss of sensitivity and are typically not recommended due to the further deviation of measured data from linearity that results.
Conclusion
The gain setting is an important parameter for selecting the optimal measurement window for your assay. When determined correctly, the gain setting enhances the signal-to-background ratio as well as measurement sensitivity and ensures that all data points of a test run are recorded properly.
Our Application Specialists Ann-Cathrin Volz, Ph.D. and Martin Mangold, Ph.D. further discuss the impact of different plate reader parameterson your data in the following video: How to Video: Get the best out of your microplate reader.