When taking pictures with a camera or mobile phone it is important to stay in focus to get the best results, right? The same also applies for the optic system in microplate readers! This HowTo note will highlight the focal height setting which enables you to adjust the focus of your microplate reader.
In a microplate reader, the focal height is defined as the distance between the detection system and the microplate (i.e., the sample). The optimal focal height indicates the plane at which the microplate reader can detect the highest signal intensity of a sample. Using a sub-optimal focal height for your measurements will have a negative impact on your results.
Did you know?
The range of the focal height setting on BMG LABTECH readers is 0-25 mm (0-9.7 mm for bottom optic). This distance is measured from the bottom or the top of the microplate depending on whether the top or bottom optics are used, respectively.
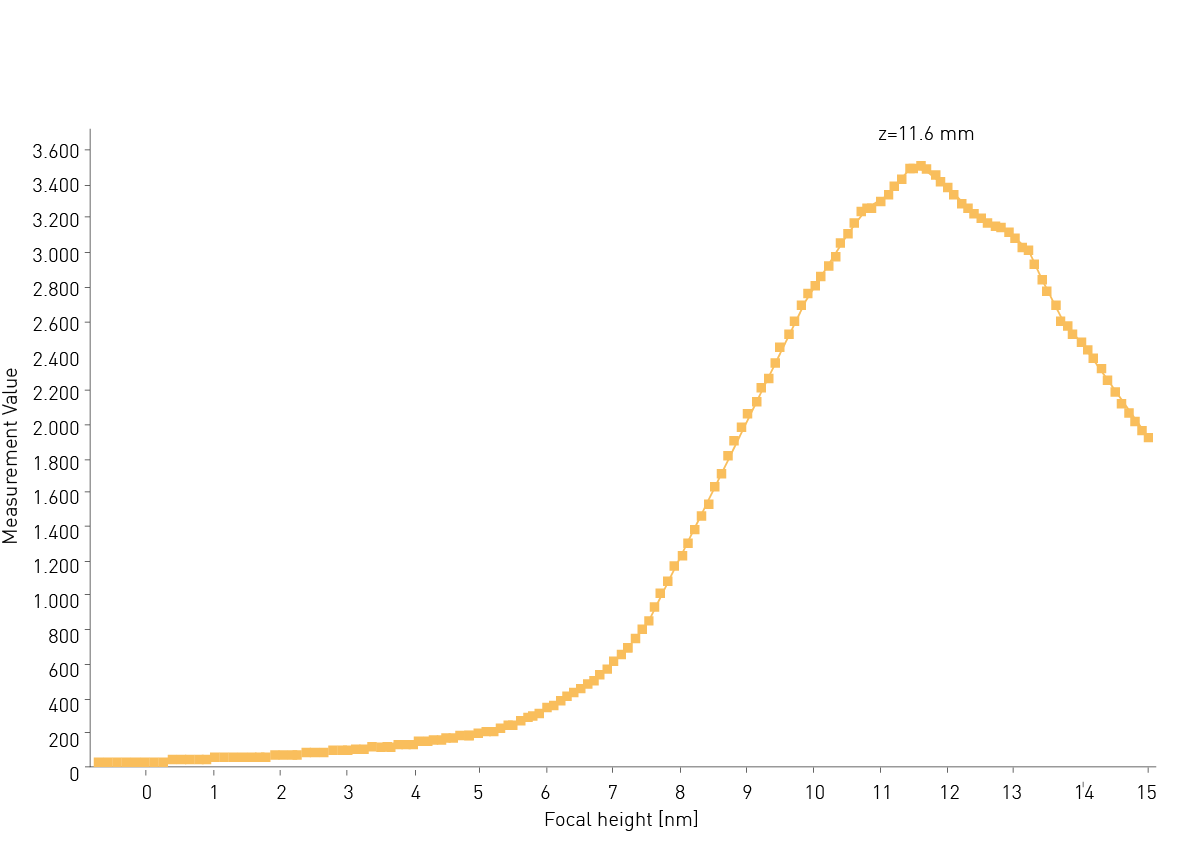
Different models of microplate readers and readers from different manufacturers vary in their capabilities: the focal height may be not adjustable, it may have to be typed in manually, or can be determined automatically. Instruments with no focal height adjustment are typically entry-level devices with limited sensitivity. Devices with manual focal height setting require some trial and error to empirically identify the best height for a specific assay. Microplate readers performing a focus adjustment before a measurement automatically identify the optimal focal height on a specific sample or on a group of samples (fig. 1). Once determined, you can use the same focal height from previous measurements provided the fill volume and microplate type are kept the same.
The signal intensity is generally at its highest slightly underneath the liquid surface of a sample due to the physical properties of liquid samples. A microplate reader will determine the optimal focal height accordingly by identifying the plane with the highest signal intensity. Increasing the focal height will shift the optic focus above the liquid surface. Conversely, a lower focal height will shift the optic focus in the direction of the bottom of the microplate. In both cases the signal intensity of samples will be reduced and the signal-to-blank ratios (fig. 2) and assay window will be decreased.
Did you know?
When reading from the bottom, the focal height depends on the microplate used and other factors including the thickness of its bottom layer.
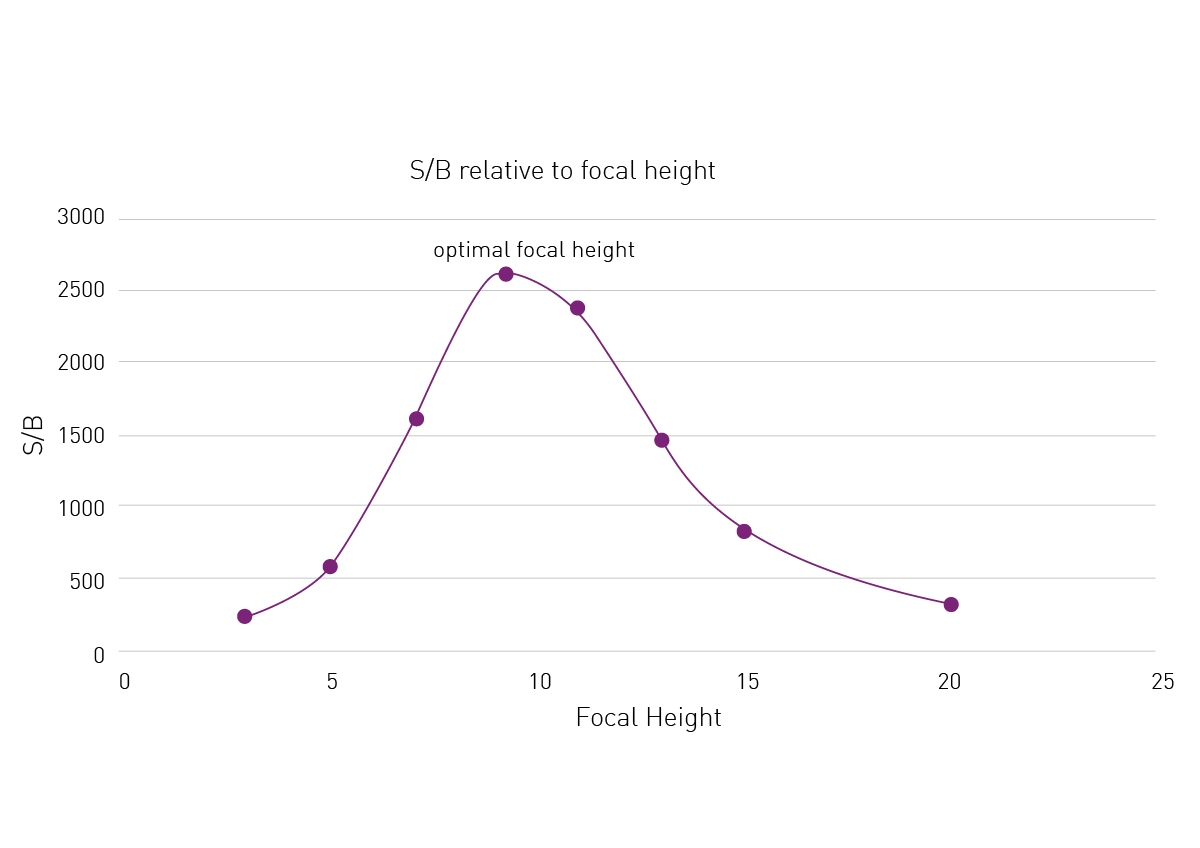 In this example, 100 nM fluorophore standard and blank samples were measured at different focal heights. Afterwards, the corresponding signal-to-blank ratios (S/B) were calculated and plotted relative to the focal height. The automatic focal height adjustment yielded an optimal focal height of 9.3 mm which resulted in the best S/B values observed during this comparison. S/B values decreased significantly when moving away from the determined optimum.
Significantly, the optimal focal height may differ between different applications and depends on the plate type, fill volume and type of assay. For example, the highest signal intensity is expected at the bottom of the microplate wells when measuring adherent cell samples.
Did you know?
By selecting autofocus at the start of your measurement on BMG LABTECH microplate readers with EDR function, the reader automatically identifies the sample with the brightest light signal and adjusts the focal height on this well.
A sub-optimal focal height setting will not only influence the signal intensity of your measurement samples. It can also impact data variation (fig. 3). In contrast to signal-to-blank ratios, which will decrease when using a non-optimal focal height, the variation between sample replicates (%CV) will increase, further reducing the readout quality of your assay.
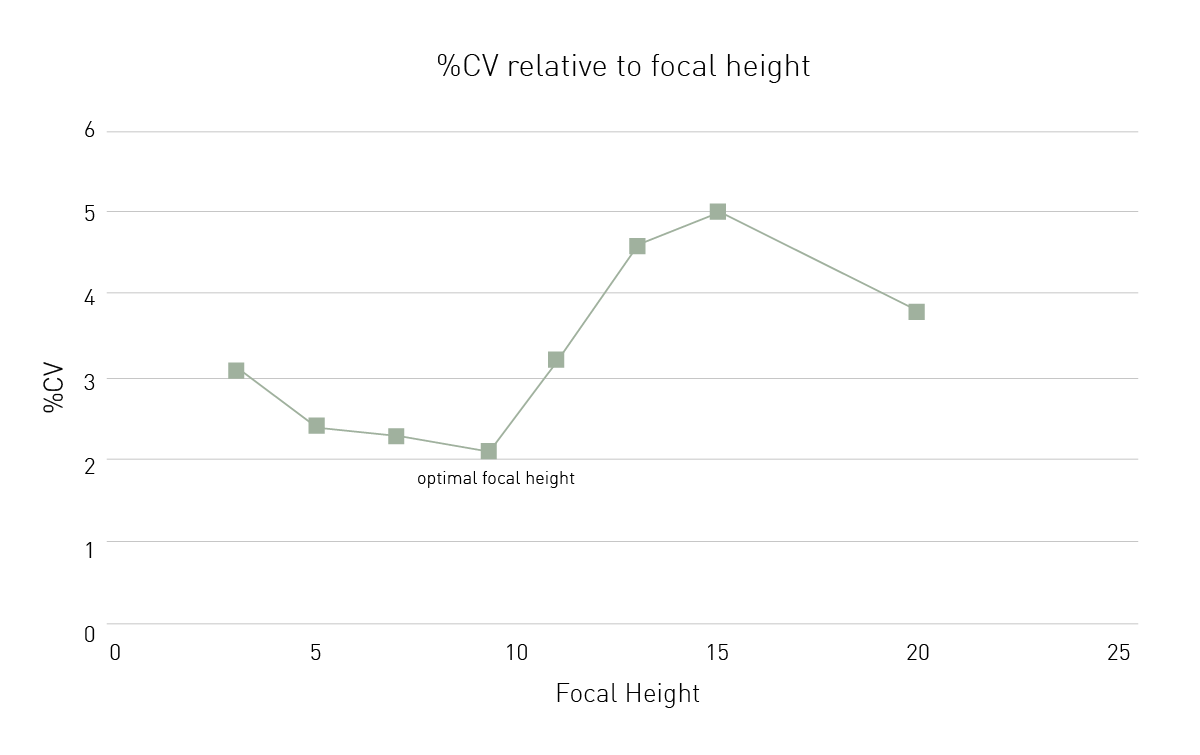
The focal height setting also influences data point variation. To highlight this principle, %CV values of a 100 nM fluorophore standard sample measured in triplicate at different focal heights were calculated. As shown in figure 3, the lowest %CV value was achieved when measuring at the optimal focal height of 9.3, as determined by the microplate reader. The measurement at focal heights deviating from this optimum resulted in higher variations. While the increase in %CV was only minimal for focal heights below the optimum, using heights above 9.3 mm led to a significant increase of the %CV by up to 3% in comparison to the optimal conditions.
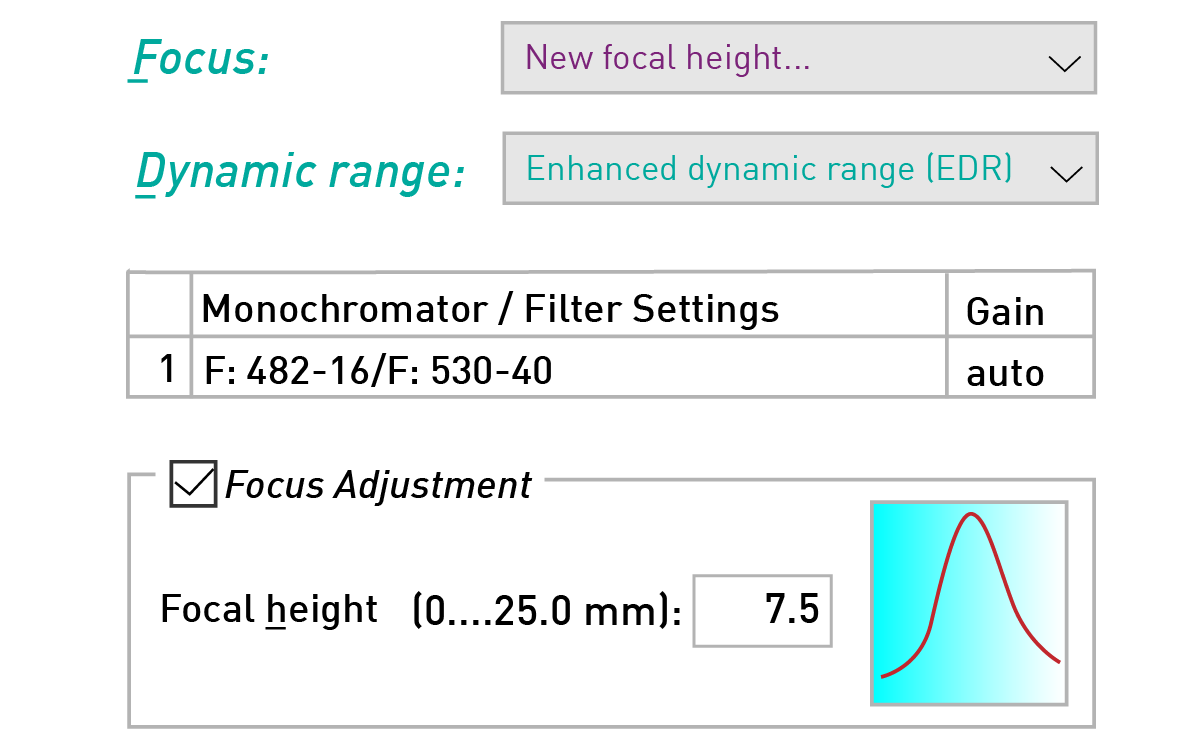
How to adjust the focal height on BMG LABTECH readers
The focal height of a BMG LABTECH reader can be adjusted after selecting a test protocol in the “start measurement” window. Simply select a sample well (or multiple wells) you want to perform a focus adjustment on, select ‘New focal height’ or ‘Autofocus’ (if available) and click the ‘start adjustment’ button.
As you can see, adjusting the microplate reader settings to an appropriate focal height is critical for achieving best results. However, prerequisite to this is that differences in the fill volume of sample wells on a plate must be kept to a minimum.
Since the optimal focal height is determined on the well fill volume of one sample, differences in volumes among the wells, either unintentionally due to pipetting errors or intentionally due to the pipetting of different volumes, will alter results. As highlighted in the example below (fig. 5), even differences of a few microliters among wells can lead to significant alterations in the measured signal intensities.
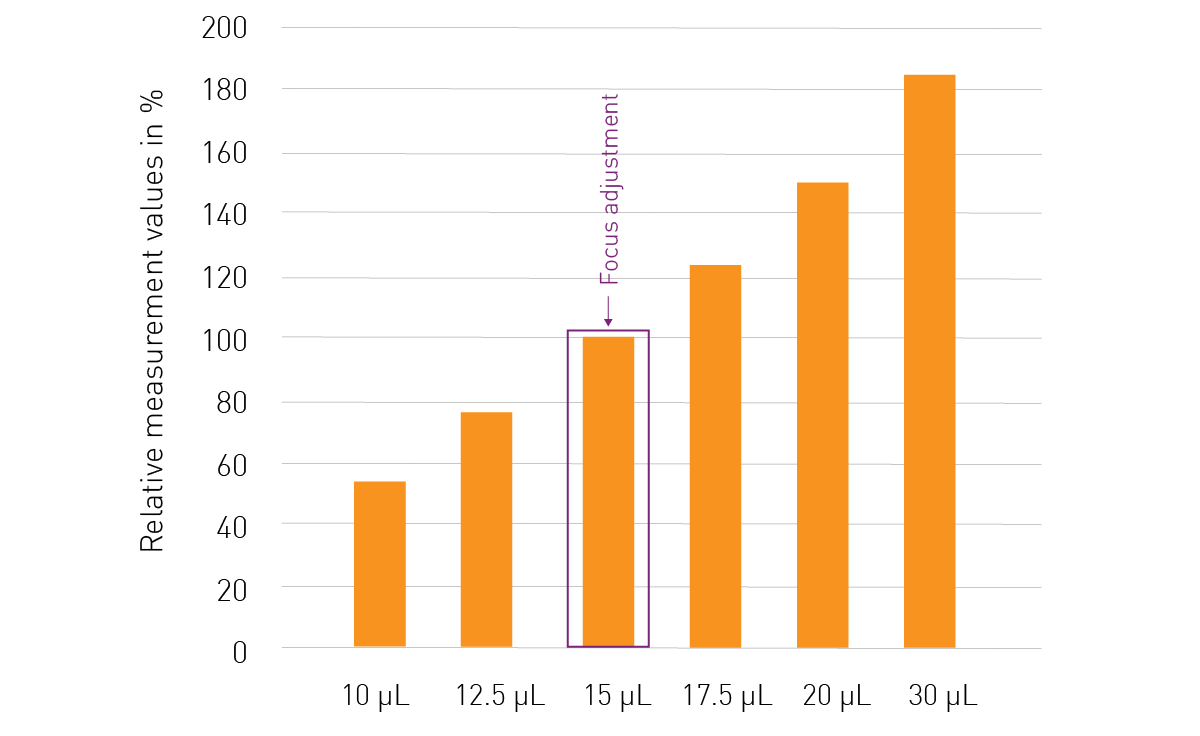
In this example, different volumes (10 to 30 μL) of a 10 nM fluorophore standard were dispensed in different wells of a microplate. Focus adjustment was performed on a well with 15 μL sample volume. All samples were measured with the obtained settings afterwards and measurement data were normalised relative to those derived from 15 μL wells. As shown in figure 5, using the optimal focal height for 15 μL volumes on wells with lower or higher filling levels will result in significant deviations. Even small differences in sample volume of just 2.5 μL can result in 20% deviations of signal intensity. In some cases this may even lead to an increase in signal, due to the higher total amount of analyte contained in wells with higher sample volumes.
Did you know?
BMG LABTECH’s online library contains a huge variety of application notes which highlight the performance of commonly used assays on our microplate readers and
provide recommendations for the reader settings,
including the focal height.
Conclusion
The focal height setting is not only important for appropriately depicting all data points of your assay but also for reducing data variation. Performing a focal height adjustment before your measurement ensures that your microplate reader will record your test samples correctly.
Our Application Specialists Ann-Cathrin Volz, Ph.D. and Martin Mangold, Ph.D. further discuss the impact of different plate reader parameterson your data in the following video: How to Video: Get the best out of your microplate reader.
Configure your microplate reader and get an initial recommendation!
- Initial recommendation
- Detailed Recommendation